I realize the Symposium is over and I am little behind. I need a little recovery time after the party at Universal so had to wait until I was home to do this one. It didn’t help the Wi-Fi was really bad at the hotel so not all my photos were synced yet across my Apple devices. I will have a Symposium recap with what is coming out in the near future. For now here is Day 3 in photos.
The presentation on .NET Core in DXP was a great surprise and looking forward it. Many clients are just not ready for SaaS.
Great presentation on customizing a Marketplace app with a traditional XM marketplace module.
Now for one of my favorite parts. The Hackerspace! This was so fun and I am excited to show my team.
Scored some cool swag.
Ended the day at Universal Studios.
There is probably something else I am forgetting, but I will remember later.
Let’s just start with SitecoreAI. The announcement for SitecoreAI was a big one. Bringing all the products together is a great idea that I think will make things much easier for everyone. I can’t wait to see it in action. So here is day 2 in pictures with some captions.
Starting with big announcement.
I will admit I never heard of Savannah Bananas. Now I am a fan. One of the best presentations I have ever heard. I like what he said about “listening carefully and responding creatively”.
Learned that you can do ASP.NET Core for XM Cloud. Maybe a choice in the future.
Wellspan’s Journey with their Sitecore partner was really impressive. A great learning experience.
First day of the Sitecore Symposium. The MVP summit and partner connect took place. I attended the MVP summit and had a fun time as always. I am excited about the new announcements. I can’t tell you what the announcements are just yet. Believe me when I say you will be excited about what is to come when you hear them too. So here are some pictures from the first day.
Tamas has been a staple of the MVPs. He will be missed, but looking forward to seeing him in a future Symposium.Who doesn’t love dessert?
It’s the Robs! Just getting started with the pics since there are so many Robs in the Sitecore community.
Always excited about this time of year, because the symposium brings a lot of new announcements and energy. As someone who has attended several symposiums, here is my list of what I am excited about.
To kick things off I plan on attending the general announcements.
Next is Now – Eric Stine the CEO of will be discussing the current state of the market. Hearing from the CEO always starts on a positive note.
CMO Michelle Boockoff-Bajdek will set the week of what to look ahead to.
AI – This of course it is hot topic and there will be many presentations to attend for it. My advice is find the one you are interested in, but also try something out of your comfort zone. Here are some of the ones I am looking at.
Sitecore’s AI roadmap: How agentic frameworks will transform digital experience – Mo Cherif
Unleashing AI innovation: the latest features in Sitecore Stream for Platform DXP – Marcus Heath and Ivan Brygar
How Sitecore’s AI features can supercharge the five stages of the content lifecycle – Robert McGovern
Zero-click killed the SEO star: Optimizing content for an AI-first audience with GEO – Brandon Bruno
Networking – Always good to see the people that you interact throughout the year in person. It is also an opportunity to make some new connections. I am excited to get to attend the parks with the MVP and Sitecore community.
Looking at the agenda, I like to attend non-technical presentations that I feel are beneficial to RBA and our clients. Here are some of the presentations I plan on attending.
Designing inclusive experiences for everyone: Build a better journey map on Sitecore -Kelsey Lindell and Megan Mueller Jensen
Creating the copilots your marketing will actually thank you for – Vasiliy Fomichev and Martin Miles.
New knowledge for developers. – As a developer we never stop learning. I am excited to attend presentations that will help me grow as a developer. Using the knowledge I gain I can show to my colleagues and bring new ideas to my clients. Here are just some of the technical presentations I am looking forward to.
Ready, set, launch: Running ASP.NET Core XM Cloud sites in production – Rob Earlam
Cutting Sitecore development time by up to 80% with AI – Rajitha Khandavalli and Kevin Suarez
Rethinking data modeling in the new content platform – Andrew Liu and Liz Nelson
Migrating an XM/XP module to XM Cloud Marketplace – Erica Stockwell-Alpert
You’ve been asking, and we’ve been listening: .NET is coming to platform XM/XP – Vignesh Vishwanath and Maxim Sidorenko
Sitecore Run – Okay I needed to put this one out there as I hope to run with others. I love running and Sitecore maybe equally so I love it when the worlds collide.
The meeting of the Robs. So we have a ton of Robs in the Sitecore world. I hope we can take a photo together. So if you are a Rob and are reading this let’s plan a date time.
The content hub recently got a new update to detect AI generated content. When uploading or updating an asset C2PA metadata will be detected. You can find more information on that here.
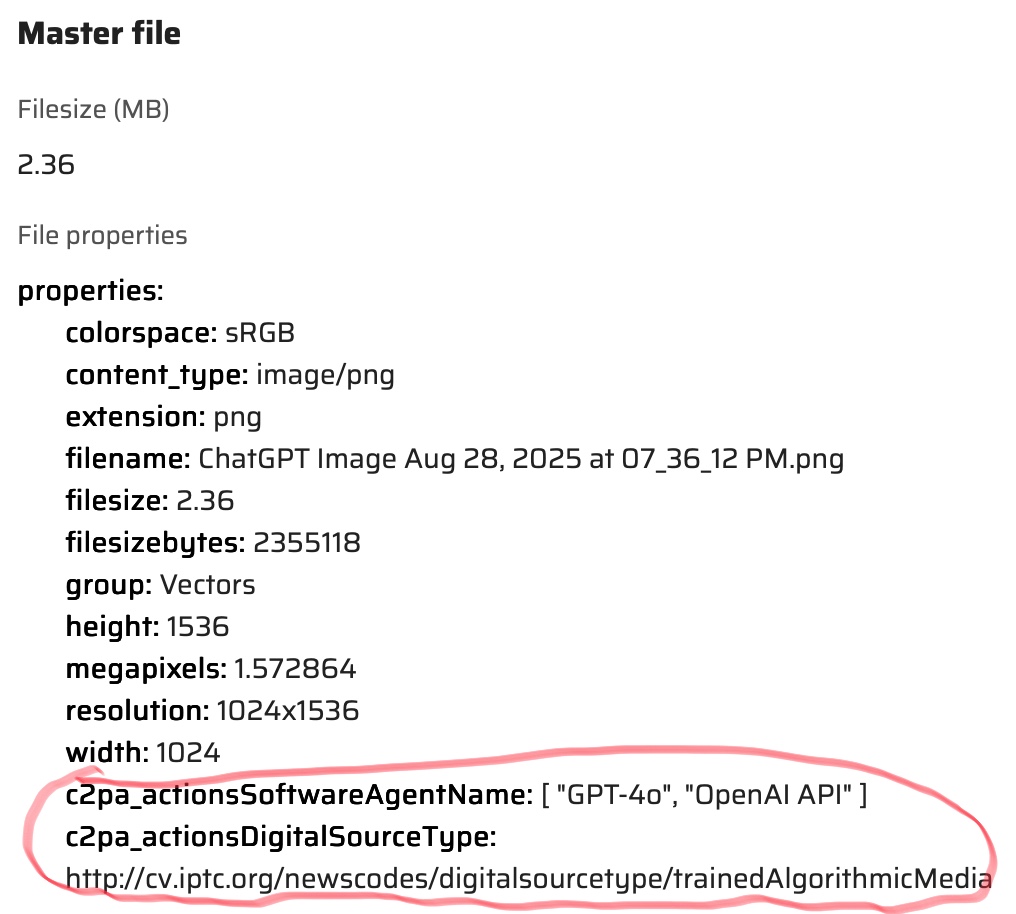
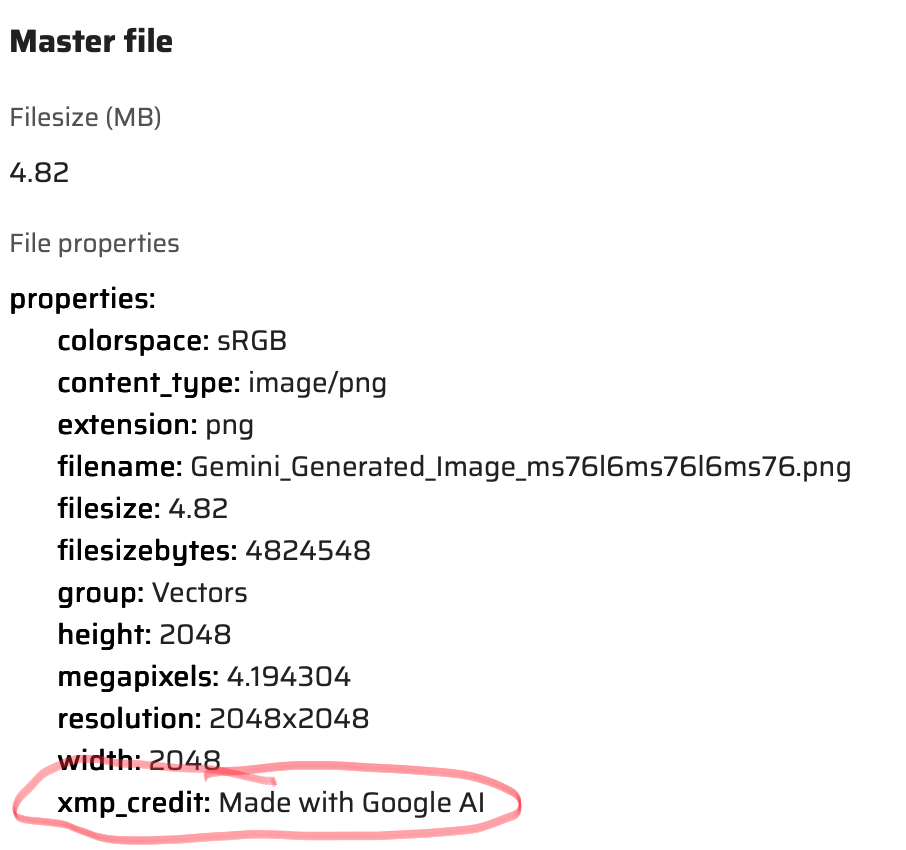
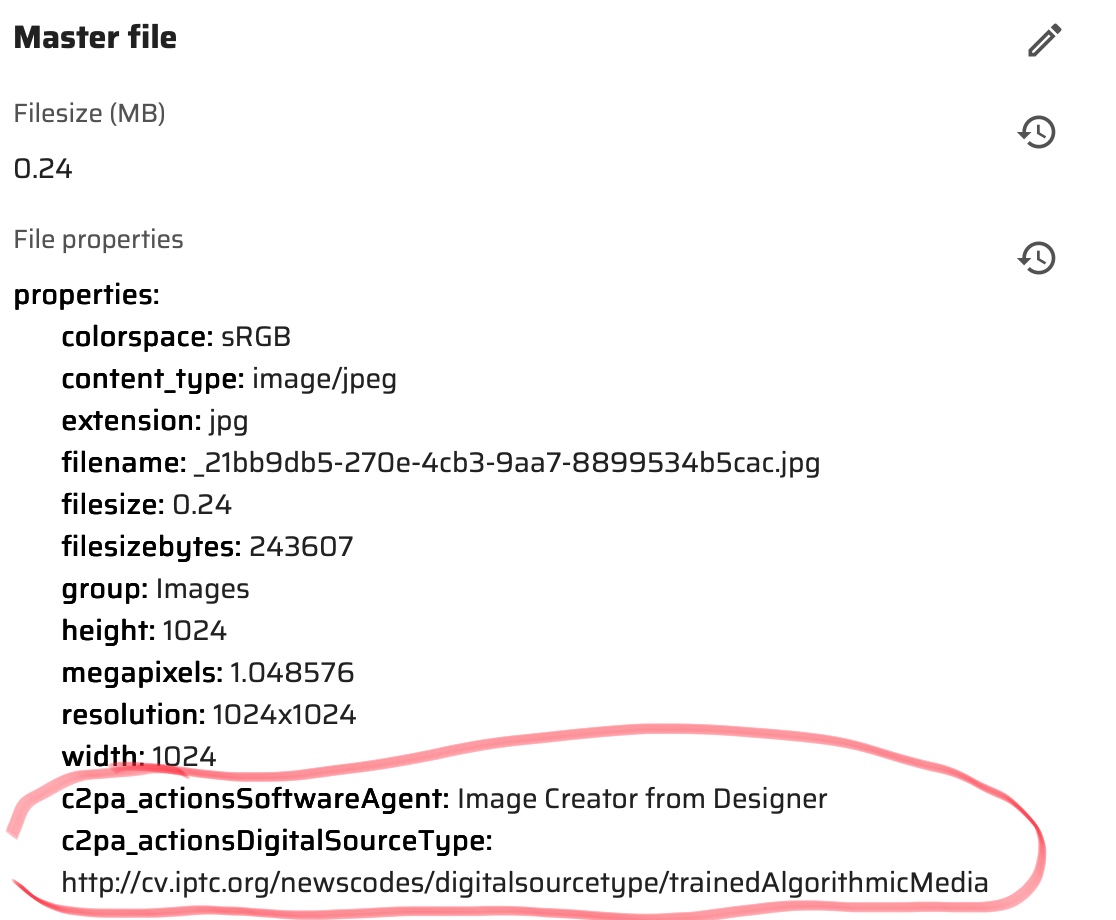
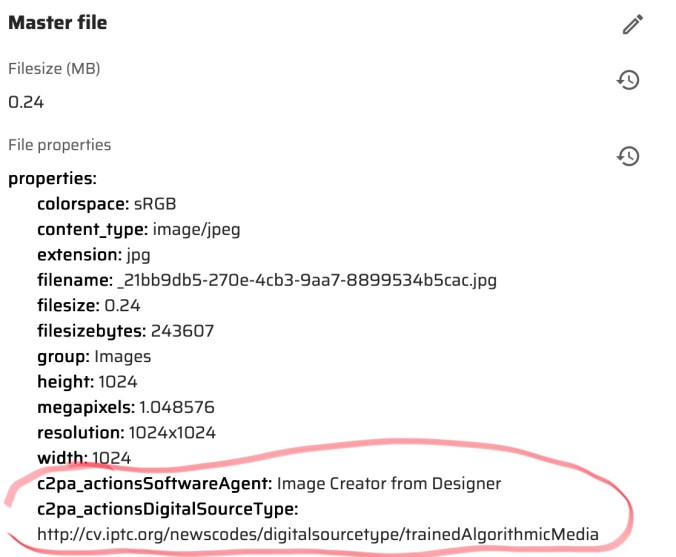
I wanted to test this feature out so going to start with simple AI created images. I used three different AI image generators. ChatGP, Google Gemini and Bing Image Creator. I asked them to “create me an image of a blue dodge challenger jumping over the Willis tower.” In the chart below you will see the image that was created. Below the image is the new Content Hub properties that were generated for each image. You will notice the additional tags highlighted. For some reason didn’t see the same fields in Gemini although I did see the credit line for Google AI.
ChatGPT
Google Gemini
Bing Image Creator
As you see above new fields are at the end of the properties section.
One of the things I enabled was the Gen AI section on the asset detail. This was enabled from the Tabs/System section of the Asset Details.
The section will show something like the following for the AI generated image on an Asset.
In my opinion by identifying AI images you can make the choice to use them or not. Some companies have polices restricting the use of them. You can find more on this new Content Hub feature here.
One of the things announce during Symposium that Sitecore Stream would be available for all platforms. I got to first use it in the Content Hub, but I was finally able to try it on DXP. I found it is available on the demo portal so I quickly deployed a new site. So here is the features I found and some fun tests I was able to do.
Single Line Text
All fields will work similar so I will start with a Single Line Text. In an AI enabled component you will see Sitecore Stream symbol. Clicking on it will bring up an AI enabled search.
The following will appear. I am going to ask “Can you make a title about something supernatural?”. Then click the Generate button. This is what we get.
If I select a Brand and generate again this is what I get.
Now I am going to use the Variants to generate option and choose number 3 to use.
Now we have a title to work with to make things really pop.
Rich Text Editor
The RTE field works exactly the same way as Single Line Text field, but will give a longer text version.
Let’s test this a little more though. I am going to have it create a bulleted list with and image of something supernatural. Now I am really impressed.
How about if we ask for something in a different language? Sitecore Stream can do that too.
Experience Editor
Works in Experience Editor too in case you were wondering.
Configuration
I didn’t have authorization because this is a demo site, but in the Desktop there is a Stream section added that you can configure Sitecore Stream.
Future enhancements?
This is a great start and hope things continue to be added. One thing I liked to see is an image generator for customers not in the Content Hub.
Just finished up the Sitecore Chicagoland Meetup and what a great time it was. Many attended and it was one of the best turnouts I have seen in any meetup. Lots of partners and clients attended.
The meetup started with a tour of Shure Incorporated. I don’t know too much about mics and broadcasting. However I learned quite a lot of the history of Shure and I got to see some really cool things. Maybe I should replace my Yeti microphone?
The first speaker was Craig Burkhart from Ecolab. I always like to hear Craig speak. He has a lot to share about his recent and current journey with personalization and using AI. They are using a great tech stack including the Content Hub (one of my favorites). Some of the highlights:
Personalized content based on visitor’s profile.
Creation of language specific content and measuring how well it is interpreted.
Breaking out the way their content is created and delivered.
Next up was Luke Pace from Perficient. He did a great presentation on using Headless, Next.js and Vercel for XM Cloud.It was great to hear the challenges and obstacles he was able to overcome and deliver a great product. Highlights include the following:
Optimizing and trimming your deliverables.
Creating efficient links with next/link.
Enabling and using Vercel Fluid Complete.
What a great time and can’t wait for the next one. The combined effort of Chicago based partners has really made a difference.
Shortcuts = time savers. Sometimes the easy way is just as efficient as the hard way. Raw values are not just something that is checked in the content editor menu ribbon by accident. Utilizing them can save valuable time and also help you fix things that are not so easy to fix. I will take you through some examples when I have used them.
Turning on Raw Values
First though let’s turn them on. You can find them on the top ribbon under View. Just check Raw values. Keep in mind if you don’t want to see them, just uncheck them to go back to normal. There is always a case when someone forgets to uncheck them or accidentally checks them.
Rich Text
This is one is pretty straightforward. I have come across issues with an RTE field having HTML that just does not want to display right. Even when you select Edit HTML it still doesn’t work. With raw values turned on you can see what exactly is in that field and edit it. Especially handy for the expert front-end developers.
Not Raw:
Raw:
Multilists
Multilists visually look like a simple selection. Sometimes though you want the same values in a similar item and don’t feel like clicking the same selections. Or you are searching for a template that is inherited and you don’t feel like clicking through the tree. Raw values to the rescue.
Typical Multilist – Not Raw:
Raw:
As you can see above the values that are selected show as a GUID separated with a Pipe | symbol. If you want to have the same values in another item, just copy the values. Then, paste them into the same field in the other item. Or copy the GUID you want. Add a | and the GUID to the item field you are copying to. This also comes in handy for template inheritance. It is often easier to use the template GUID being inherited to search and find it.
Presentation Layer
This is one of my favorite ways to use raw values. This has saved time many times. Using raw values in presentation layers can fix some of the following issues by copying, pasting, removing values.
Different layout between language versions.
Accidentally removed rendering.
Remove rendering that has been deleted based on GUID.
Not Raw:
Raw:
PowerShell
Now you have an idea of how values are stored in Sitecore. When writing PowerShell scripts basically updating something can be simple as setting the GUID list.
Recently an update came out for creating Content Hub Variants. With this new change you can take an original content piece and create a variant of it in a different language. The process automatically translates the text for you. This update is a big deal to me. Especially with multi-lingual sites I work on. Sometimes, I need translated text for a placeholder. No more Google Translate cut and paste. I am sure this will save a lot of time for content authors.
Create a variant is pretty straightforward. First step is to go the Content menu and do a search.
I will do a search for Running.
Select and open one of the content pieces. Then navigate to the more action menu (three dots) on the upper right hand of the screen. Then choose Localize.
The following window will pop up. Choose a Name for the Variant, a Locale and Check Translate with AI. Then click the Create Button.
A new version will be created translated with the Locale you chose. On the top of the screen you will see the word Variant. Look at all that translated text.
After variant(s) are created you can easily navigate to the original and other variants. Select the More Actions (three dots) and then choose Variants.
The next screen will appear. You can the select a version to navigate to.
I really love this feature and I hope we see similar feature soon throughout Sitecore’s various products.
A while back I got to preview the concept of the visual search feature in content hub. Since then I have been anticipating its release. It is officially here and I wanted to put it to the test.
To access this feature, navigate to the Assets.
Click on the AI button and you should see the following. You will see a few things show up. You can use the first icon to search by image. The second icon lets you search by color. You can also type in keywords.
Click on the first icon to search by an image. You will see the following file upload screen. You then can select a local image to search by. In this case I will select a runner in a city.
After uploading the image, a search for images will show related images.
Next using the search by color option you will see the following. Choose a color.
Once the color is chosen you will see images related to that color.
Once you have results you can even break things down further by adding search text.
What if this is a common search that a content author does? Well you can save this search and use it again if needed. Simply click on the Save button.
The next screen will appear. You can then name your search and share with other content authors.
When you go back to assets you will then have the search under the saved searches.
What if you just wanted to search by keywords? Well you can do that to. Simply type in your search keys and click on the arrow. The keyword(s) will be used to visually search images.
If you need to include existing assets for visual search you can do so in the AI settings.
So using this is something I can see streamlining the searching process and making it much faster in retrieving assets. In my opinion this is one of the best search features I have seen. It stands out not only in the content hub, but everywhere else.